728x90
이전시간에는 순수 JDBC와 JdbcTemplate을 공부해보았다.
점점 코드가 짧아지는 것을 알 수 있었지만 SQL은 결국 개발자들이 직접 작성해야했다.
하지만 오늘 배울 JPA는 SQL 쿼리도 JPA가 자동으로 처리를 해줘 개발 생산성을 높여준다고 한다.
그렇다면 직접 실습을 통해 알아보자 !
1. 초기세팅
(1) build.gradle에 아래 한 줄 추가 후 gradle refresh 해주기
implementation 'org.springframework.boot:spring-boot-starter-data-jpa'
(2) application.properties에 추가 해주기
spring.datasource.url=jdbc:h2:tcp://localhost/~/test
spring.datasource.driver-class-name=org.h2.Driver
spring.datasource.username=sa
spring.jpa.show-sql=true
spring.jpa.hibernate.ddl-auto=non- show-sql : JPA가 생성하는 SQL 출력
- ddl-auto : JPA는 테이블을 자동으로 생성 ( none 기능을 끔 / create 테이블 직접 생성 )
2. 코드작성
(1) Member domain - JPA 엔티티 매핑
@Entity :  JPA가 관리하는 Entity 설정
public class Member {

    @Id @GeneratedValue(strategy = GenerationType.IDENTITY) //DB가 알아서 생성해주는것
    private Long id;

	private String name;

    public Long getId() {
        return id;
    }

    public void setId(Long id) {
        this.id = id;
    }

    public String getName() {
        return name;
    }

    public void setName(String name) {
        this.name = name;
    }
}
(2) 서비스 트랜잭션 추가 - @ Transactional
@Transactional
public class memberService {

    private final MemberRepository memberRepository;


    public memberService(MemberRepository memberRepository) {
        this.memberRepository = memberRepository;
    }

    /*회원 가입 */
    public Long join(Member member){

        // 같은 이름이 있는 중복 회원 x
        extracted(member);

        memberRepository.save(member);
        return  member.getId();
    }

    private void extracted(Member member) {
        memberRepository.findyByName(member.getName())
                .ifPresent(m -> {
                    throw new IllegalStateException("이미 존재하는 회원입니다.");
                });
    }

    /*전체 회원 조회*/
    public List<Member> findMembers(){
        return memberRepository.findAll();
    }
    public Optional<Member> findOne(Long memberId){
        return memberRepository.findById(memberId);
    }

}
(3) JPA 리포지토리 생성 - JpaMemberRepository
package hello.helloSpring.repository;

import hello.helloSpring.domain.Member;
import hello.helloSpring.service.memberService;

import javax.persistence.EntityManager;
import java.util.List;
import java.util.Optional;

public class JpaMemberRepository implements MemberRepository {

    private final EntityManager em;

    public JpaMemberRepository(EntityManager em) {
        this.em = em;
    }

    @Override
    public Member save(Member member) {
        em.persist(member);
        return member;
    }

    @Override
    public Optional<Member> findById(Long id) {
        Member member= em.find(Member.class,id);
        return Optional.ofNullable(member);

    }

    @Override
    public Optional<Member> findyByName(String name) {
        List<Member> result = em.createQuery("select m from Member m where m.name = :name", Member.class)
                .setParameter("name", name)
                .getResultList();
        return result.stream().findAny();
    }

    @Override
    public List<Member> findAll() {
        return em.createQuery("select m from Member m", Member.class)
                .getResultList();
    }
}
3. 테스트
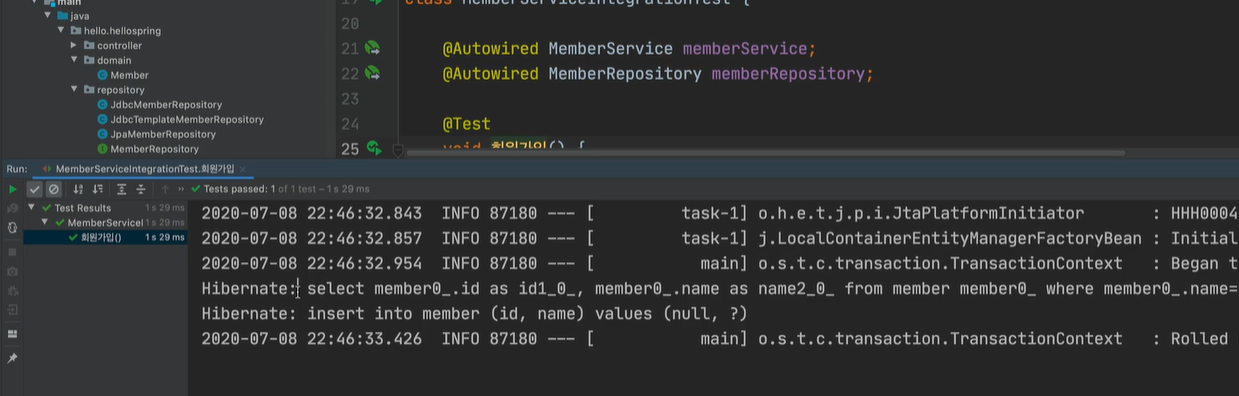
Hibernate를 보면 select / insert로 자동으로 생성되는 것을 알 수 있다.
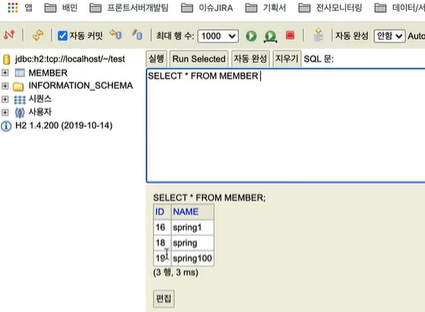
@Commit을 통해 DB에 들어가는지 직접 확인할 수 있다.
테스트가 전체 성공 한 것을 볼 수 있다.
음.. ? 일단 이게 뭐지? 하면서 들었다.
실무에서 잘 사용하려면 진짜 공부를 자세히 해야겠다는 생각을 했다.. 어려워 역시
728x90
'ON > 실습' 카테고리의 다른 글
| [Spring Boot] AOP (0) | 2023.11.30 |
|---|---|
| [Spring Boot] 스프링 DB 접근 기술 - 스프링 데이터 JPA (1) | 2023.11.29 |
| [Spring Boot] 스프링 DB 접근 기술 - 순수 JDBC 와 JdbcTemplate (0) | 2023.11.27 |
| [Spring Boot] 회원 관리 예제 - 웹 MVC 개발 ① (0) | 2023.11.24 |
| [Spring Boot] 스프링 빈과 의존관계 - 자바 코드로 직접 스프링 빈 등록하기 ② (0) | 2023.11.23 |